BANDAI SPIRITS Bandai Hobby - Char's Counterattack - Hi-Nu Gundam, MG 1/100 Model Kit

Brand:

3.2/5;

202.22

Gundam RX-93-2 Hi-Nu Gundam MG scala 1/100

Descrizione Kit modello di assemblaggio molto dettagliato in scala 1/100; viene fornito con un assemblaggio a scatto, pezzi colorati abbinati, accessori e manuale di costruzione completamente illustrato. Non hai bisogno di vernice o colla. Prodotto importato dal Giappone. ;Le istruzioni sono scritte in giapponese. Informazioni legali Nonostante sia nostro impegno assicurare la correttezza delle informazioni dei prodotti talvolta i produttori possono modificare le loro specifiche. L'imballaggio effettivo utilizzato e i materiali possono contenere informazioni che differiscono da quelle presentate nel nostro sito web. Si consiglia di non basarsi solo sulle informazioni qui presentate ma di leggere sempre le etichette, gli avvertimenti e i consigli d'uso prima di utilizzare o scartare un prodotto. Si suggerisce di contattare il produttore per avere maggiori informazioni su un determinato articolo.
Assemblaggio necessario ‎Sì
Batterie/Pile incluse? ‎No
Batterie/Pile necessarie? ‎No
Colore ‎Blu
Dimensioni prodotto ‎59 x 32 x 8,99 cm; 1,18 kg
Età consigliata dal produttore ‎3 anni e più
Numero modello ‎148832
Numero modello articolo ‎148832
Numero pezzi ‎1
Peso articolo ‎1,18 Kilograms
Telecomando incluso? ‎No
Tipi di materiale ‎Plastica

3.2

6 Review
5 Star
63
4 Star
18
3 Star
8
2 Star
2
1 Star
9

Scrivi la tua recensione

La tua mail non sarà pubblicata. Tutti i campi obbligatori sono segnati con*

Scritto da: jos
divertente
Divertimento assicurato per per gli appassionati di gunpla. Qualche problema con il fissamento delle ali, alla fine le ho tolte perchè alcuni pezzi cadevano. Le gambe mi sembrano sproporzionate rispetto al resto del corpo.
Scritto da: crimzem
... a small bb gundam didnt last long but i loved making it and i recently looked back and started ...
when being a kid i had a small bb gundam didnt last long but i loved making it and i recently looked back and started to get into them, brought this one as a little treat for myself and boy was it a good treat took me around 3-4 days. the first ever MG ive ever made and i was shocked while building it how much detail has gone into making and the mechanics of it, rest to say it wont be the last one brought, amazing seller, great price being the cheapest out their, 5* for everything.
Scritto da: こーちゃん
ハイニュー
やっはし私はMG RX-93-ν2 Hi-νGUNDAM(ver.Kaじゃなく旧版MGの方) です。GUNDAMバトオペプレイしてて惚れました❤️ かっくいーっすよね❢たしかに ver.kaもかっこいい…しかし!私はこちらのハイニューガンダムが好きです。バトオペのハイニューガンダムかっこいいです✨
Scritto da: Jes
Superb!!! Tips + Tricks
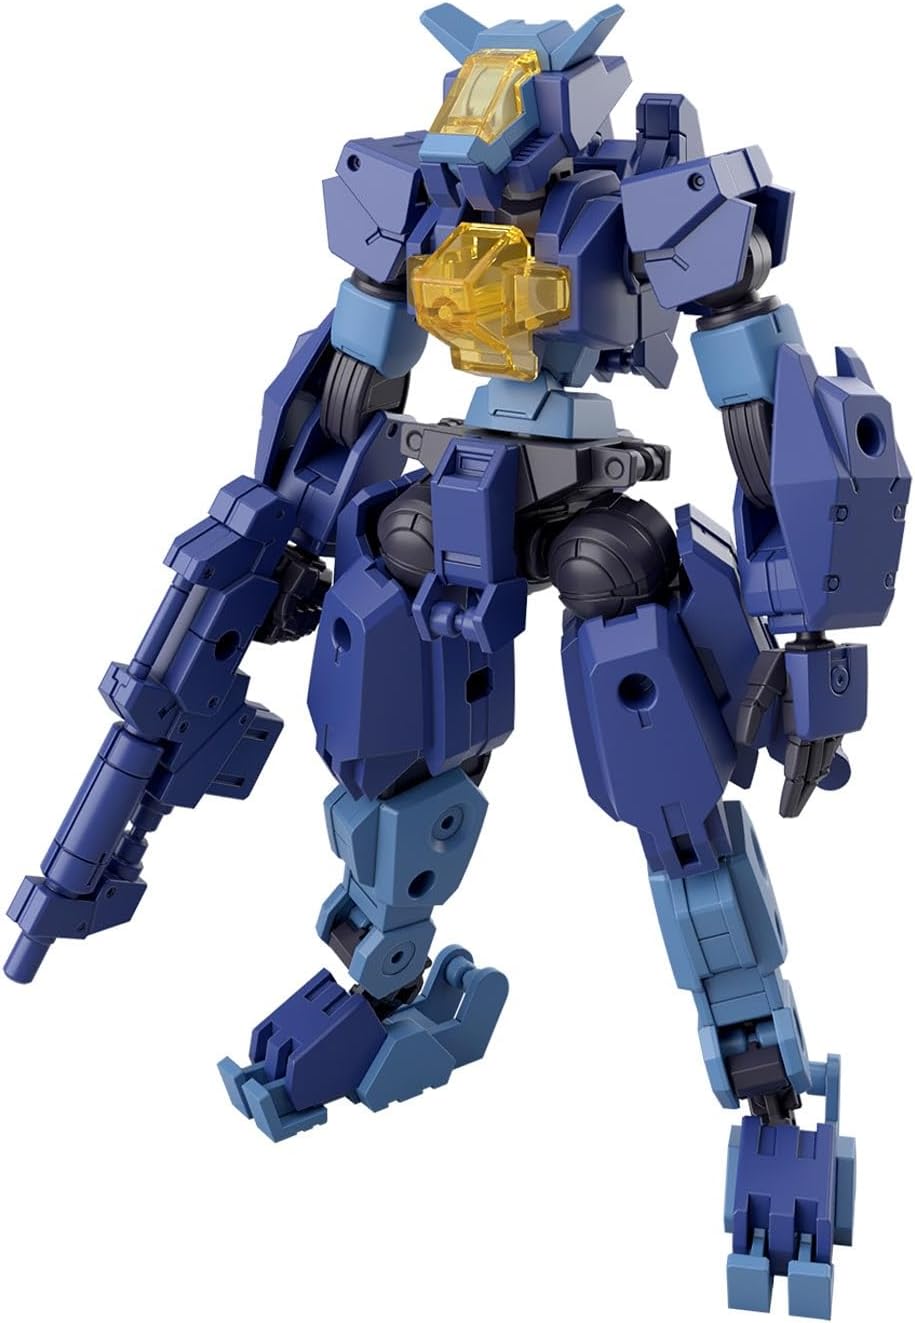
Fantastic model. I won't repeat all the other kudos. I was a joy to build, but it took almost a month's worth of free time (if you sand all the edges, mark all the lines, blend, top coat, then apply all the decals). My only notes on the build for you are: 1.) Download "google translate" for your phone, launch the app, then use the camera to translate the instruction booklet for you. Apparently translating out of Japanese into English is not very precise and you will get multiple translations as you move the camera around. But it really helps. 2.) There are a couple left-over pieces that you do not need. Don't worry about them though. They are noted in the instructions as being "extra" (once the translation made sense). 3.) Pick up a modelers kit. The tiny nippers, tweezers, files, sanders, etc. were indespencible and saved a ton of time. Though with precision comes time-wastage on minutia. So be ware. I primarily use the nippers to clip off each piece, then used the emery boards (included) for sanding and polishing. The files were a little more aggressive, but easier to work in smaller areas than the emery boards. The tiny exacto knife was not very helpful since the clippers were very accurate, but always nice to have. 4.) Do NOT use ANY glue unless you can read Japanese fluently. "Press together" and "Stick together" (implying glue) is a very subtle but crucial distinction that Google Translate may or may not covey with any accuracy. You just blew $100 for this model and the extra tools. Don't ruin it with glue in the wrong places. It is possible to almost completely disassemble the pieces of the completed model for painting (or gluing). Gluing after your initial build is better since you'll understand the model better. There are some pieces that are designed to separate as the arm or leg flexes so if you glue them you've just paralyzed your Gundam. 5. ) If you DO use glue, apply it with a tooth pick. You will never need more than a super tiny drop to keep these already tightly fitting pieces cemented together. Plus, the tiny glue drops are easy to break apart if you make any mistakes. 6. ) Watch some videos on YouTube on how to use the liner markers. They don't dry like normal paint so you will need to clear coat the entire model to avoid smudging your lines you spent so much time perfecting. Smudging them on purpose can look really cool, like corrosion or grime after a battle, but it will keep smudging as long as you work with that piece until you clear-coat the whole model. 7. ) Clear coating - disassemble the main components of the model (legs, arms, head, torso, etc.) and put them all in a big box you to spray them all in. The reason for doing them all at the same time is that there are soooooooo many sides, angles, blocked areas, etc. so the ambient spray mist that builds up in the box is very important. Plus it will save you a ton of money over having to buy multiple cans of clear coat. 8. ) Clear coating + lines - if you used liner markers the clear coat may dissolve or dilute or cause the ink to run or separate and spread out. I recommend your first coat of clear coat be VERY light. Just enough to pin down your lines a bit. Keep your next couple coats very thin as well. Only go heavier once all your decals are on. 9. ) Decals should be under your clear coat, that's true. But it's nearly impossible to get all your lines perfect and get all the decals on without messing up your lines from all that handling. Apply the decals after a couple clear coats. Then do a couple more coats on top of the decals. 10.) Possibly the most important thing!!!!!!! The trays of parts are named "A" "B" or "C1" etc. The letters designating which tray is which are VERY hard to see. I strongly recommend you put a big piece of masking tape on each tray (wrapped around the frame edge and folded over so you can write on both sides of it) then write the tray name on each one LARGE so you can see it. There are hundreds of parts. Without this step, you will waste another hundred hours trying to figure out which one is where. 11.) CORRECT paint marker colors... White is https://www.amazon.com/gp/product/B00750J1EO/ref=oh_aui_detailpage_o01_s00?ie=UTF8&psc=1 Blue is TBD - please let me know if you figure out the correct blue. Thanks :)
Scritto da: mholyome
Mighty Mouse.
Great Gundam kit to put together, my only fault with it is that compared to the Nu Gundam it is pretty small. Comes with a hearty stand and some effects parts that look cool, but I haven't bothered to use.
Scritto da: Thomas Christopher Walden
This was a fantastic model to build
This was a fantastic model to build, and after a couple of months has held together perfectly. This was the first model I built since seeing them as a kid, and I enjoyed myself much more than I expected. If you've never built a gundam model, note that you will need tools to make this, like nippers for the plastic nubs and some sand paper to help joints fit well. There are many guides out there that go into specifics. Highly recommend learning to do line-work and at least a topcoat, as they're both pretty easy and really add a lot to the model. It can stand on its own with a little fiddling. It does come with a stand, which it sits on very unobtrusively. The shield is heavy - it can be difficult to position the arm because of the added weight, but there are ways to make the joints fit more tightly, which mitigates that somewhat. The fin funnels also need to be handled carefully, as while they do fit snugly into their sockets, too much moving around can make them fall off/wear out the little nubs that hold them in place. Just be careful with it, as with any model, and it will last. I really, REALLY recommend looking up guides on line work, topcoats, decals, and paint. This was my first "real" attempt at making one of these, and I think it went very well as a result of preparing ahead of time.

Prodotti correlati

Scopri il nostro network internazionale

Spediamo in 28 paesi, oltre 200.000 prodotti. Resta aggiornato, iscriviti alla newsletter.

Array